While the Tamiya product line is typically very well molded and detailed, there are some problems withe the kit, that probably stem from using early or developmental drawings of the Orbiter.
Or, the problems could have come from using Orbiter OV-101, the "Enterprise" as the reference, as this model was first produced fairly early in the Shuttle Program - decals for only Enterprise and Columbia are furnished.
In looking over my "inventory" of Space Shuttle models, it occurred to me that I only have one replica of OV-102, Columbia - that of the STS-1 stack in 1/144 scale - the Airfix model I built in 1982 after returning from the STS-1 launch trip, that is now resting on the Edu-Craft 1/144 scale MLP and Crawler-Transporter.
So, I decided to try and build a "Columbia" model, using all of the components provided by Tamiya, but to a higher level of accuracy. I chose STS-9 - the first flight of the European Space Agency "Spacelab" module, flown by John Young (CDR) and Brewster Shaw (PLT) with a multi-national crew in 1984. The Spacelab hardware is included in the Tamiya kit, but we 're making some "modifications" along the way to improve the look of the finished product.
We will not start at the beginning, as assembling the fuselage and wings are fairly straight-forward. We chose to show the Orbiter in "in-flight" mode, so the landing gear doors are closed. While the glues was setting up on the main fuselage assembly, we worked on the Cockpit.
The Flight Deck
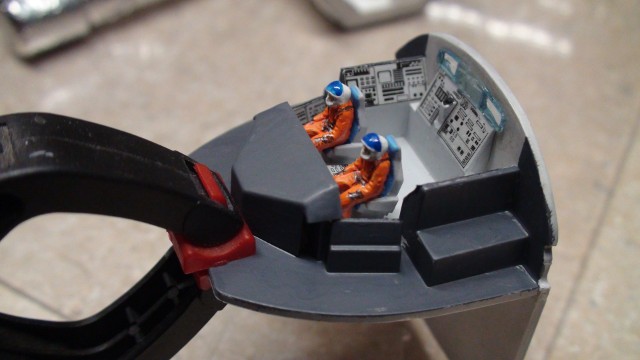
We used the panel decals supplied by Tamiya, but changed their color specifications. The faces of the panels were done in Aircraft Gray, along with the Flight Deck floor, and the outlying areas were done in Gunship Gray, to sublimate them visually. Tamiya wanted to have the astronaut figures done with white suits, which looked like EVA suits, which were never worn on the Flight Deck. So, we did the suits in International Orange, to replicate the "Pumpkin Suits" or the Launch & Entry Suits the crews actuality wear. Boots and gloves were done in black, and seat belts done in German Grey. The crew's faces were done with Testor's #1116 - Cream (nobody calls it "Flesh" anymore...) with slight highlighting to reveal facial details. the helmets were painted Flat White, and then the shields were painted on in Clear Blue, which worked out really well.
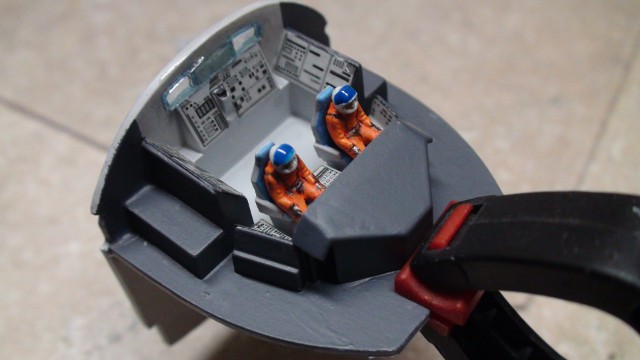
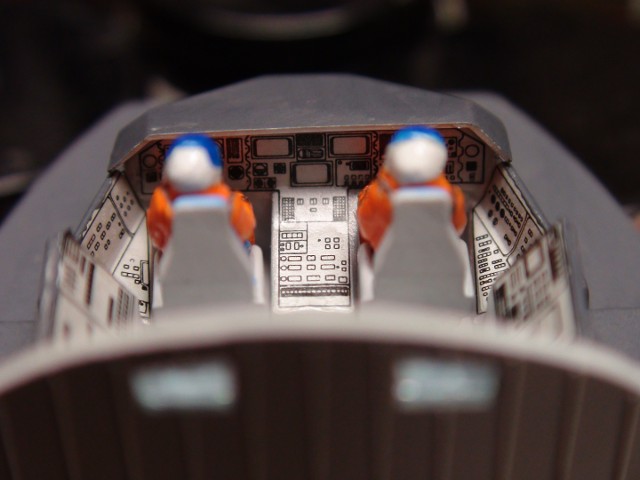
It's a pity no one will ever see this detail once the model is done, So I decided to take photos of it now, while I could.
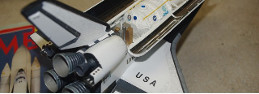
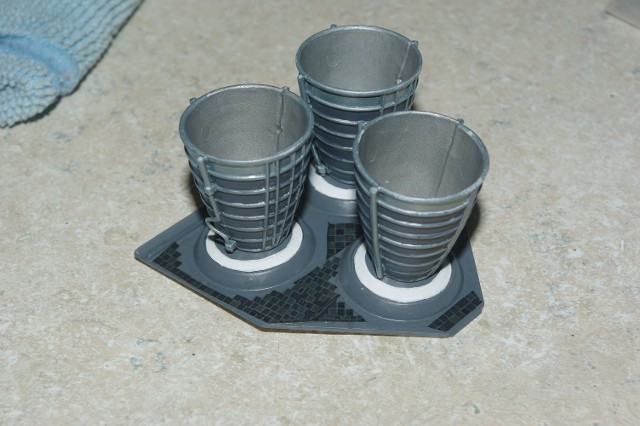
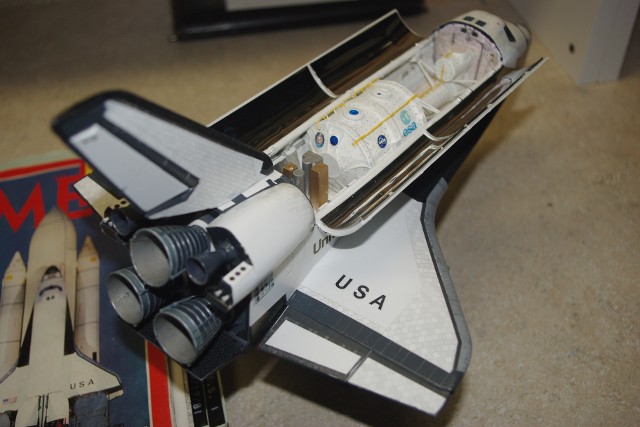
The Main Engines
The mains are very hard to work with once they are assembled onto the Orbiter, as Tamiya uses a screw and curved baker-plate to hold each engine onto the rear bulkhead, which allows the engine to "gimbal" or swivel as it does in real life, so, I decided to work on the engines separately.
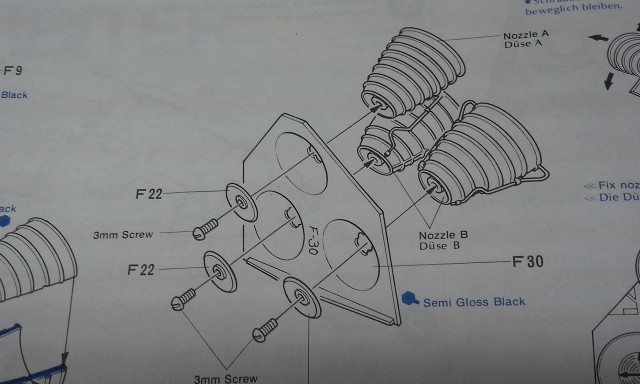
As the rear bulkhead will require tile detailing and engine gimbal shroud details applied, and those are better done without the engine on as well.
Tamiya's SSME's must have come from very early engine drawings, as the purge lines running along the sides of two of the engine bells have "loops" in them, right at the aft portion of the engine. Nowhere do any of the test or flight SSMEs have this feature. The easiest thing to do was to remove the loop and take the purge line all the way down to the bottom ring of the nozzle with thin plastic rod.
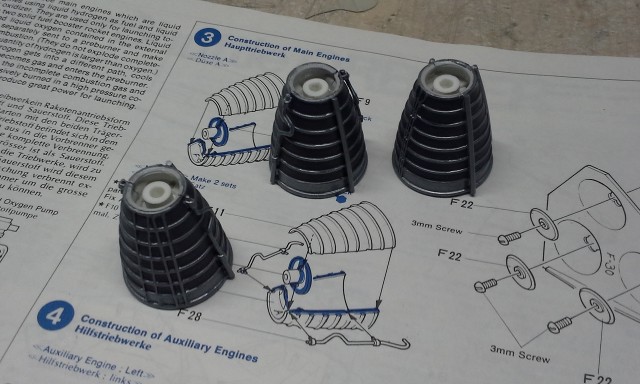
The portions of the engine's outer skins between the cooling lines were done in Testor's Model Master Engine Gray and the cooling lines and purge lines were done in a "pseudo-Titanium" blend I did using Aluminum with hints of Gold mixed in. The entire interior of the engines were done in Steel, which is just slightly darker than the mix color and also shows brush strokes better. All brush strokes were kept in the linear mode, simulating ablation from the hot exhaust.
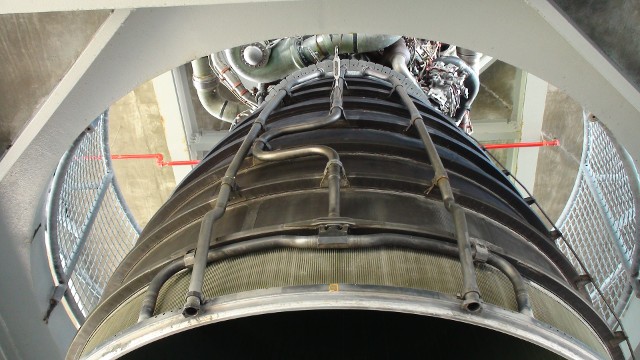
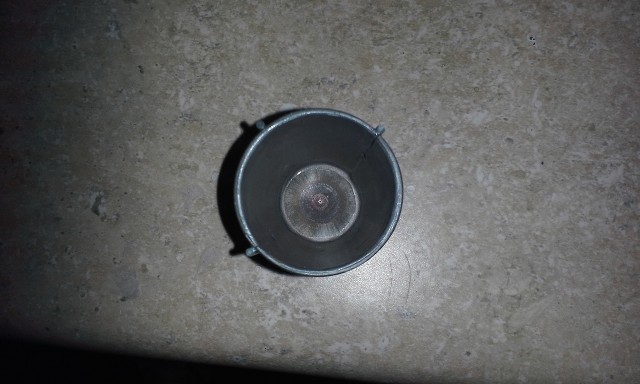
The real SSMEs. like to one on display at the LC39 Viewing Site at Kennedy Space Center, shows signs to "rings" and "rifling" on the interior, which could be caused by the resonance of the engine in operation, creating a standing wave in the exhaust. This also accounts for the "braided" effect of the SSME's exhaust plume.
Tamiya has an interior feature for each engine which is used to capture the retaining screw to assembly and is supposed to look like an injector plate from the outside. It's a bit too bib and too low to be where the real injector lies (again, based on photos of the SSME at KSC), so I used a photo taken of the engine's interior, cropped the picture down to just below the injector area, and printed that out onto Avery label stock. These were trimmed by hand and placed onto the engine fixture plate surfaces. Not perfect, but much better looking and realistic than before.
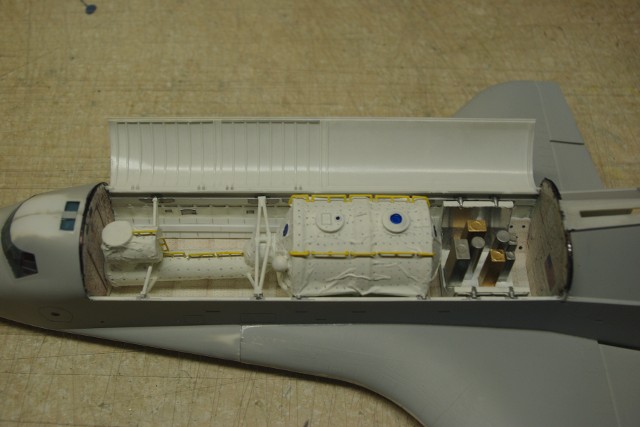
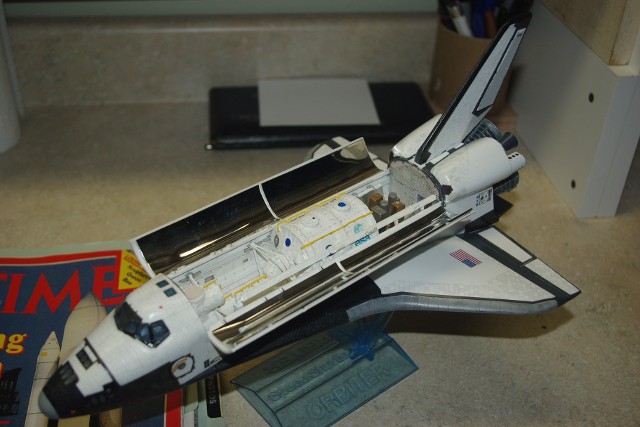
Payload Bay Interior
This is where my experience with David Maier's Edu-Craft "photo-realistic" ideology has come through again to provide some inspiration.
There are a number of Payload Bay detail sets made, but not for the 1/100 scale Tamiya, as most model companies stay with 1/144 or 1/72 scale - the foundation scales for aircraft models. So once again, a little improvisation was in order.
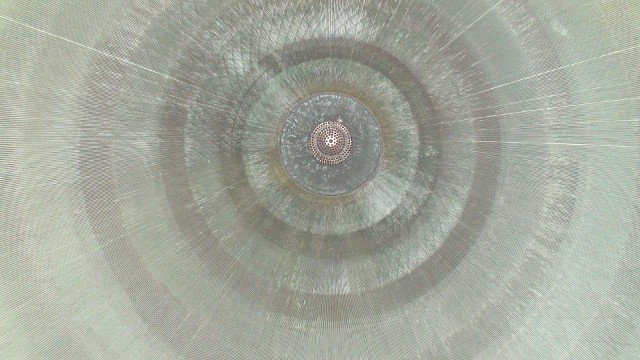
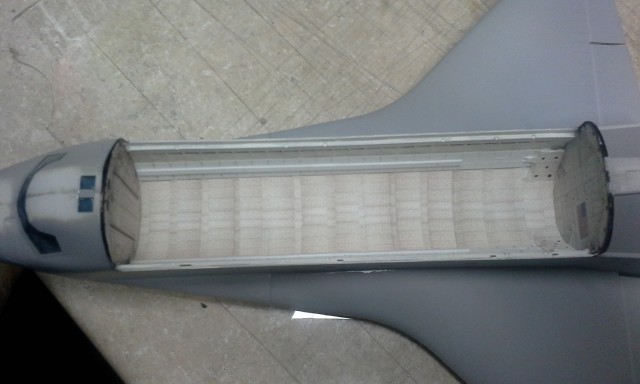
After searching through a number of NASA photos of cargo bay operations, I was able to find one that showed an almost perfect "straight-on" look into the Payload Bay's floor, or at least a section of it.
The floor is not a solid surface, but a set of fire-resistant blankets or "nets" which are fastened across the structural stringers of the cargo bay. They cover all of the wiring, plumbing and structural elements and keep things from going in there during flight, without adding undue weight. The section of the photo was lifted and corrected for curvature and then printed onto label stock.
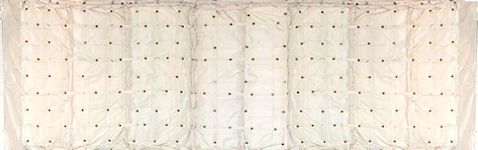
The interior of the Tamiya cargo bay had been previously covered in aluminum duct-workers tape, to provide a foundation upon which the finish could be applied. The surface was first painted flat white, but that was far too plain, even with the slight wrinkled texture of the aluminum tape. That when the idea for applying the photo-printed floor came to mind. The sections were printed, cut to size and laid in onto the tape surface. I originally left the stringers exposed, but that just didn't look right, so by using smaller strips of the floor net printouts, I covered the stringers as well. the results came out pretty well.
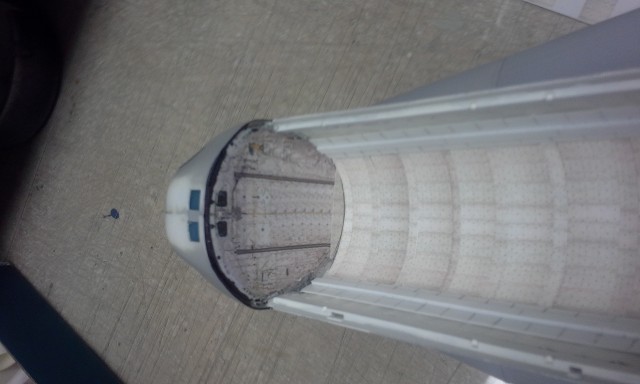
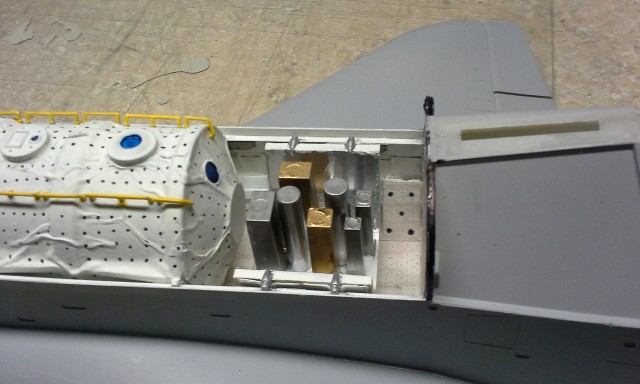
Next came applications for the forward and aft bulkheads of the Payload Bay, which had visual evidence of the EVA handles on them, but actual handles were added after application and painted yellow.
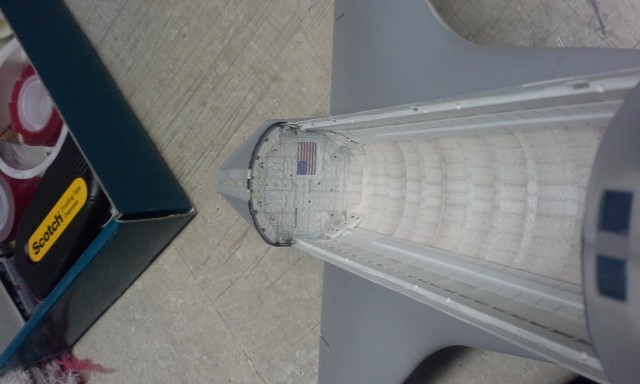
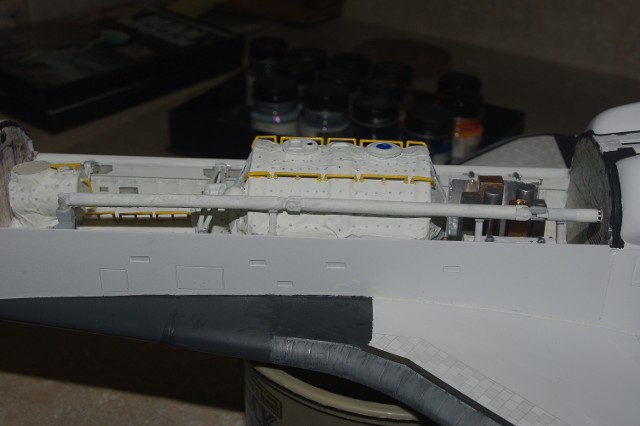
The payload bay also has electrical chases running along both sides, from which the Orbiter interfaces with what ever payload power, control or operational systems that need to be directed from the flight deck. There are various "jump-out" points that can be seen in every photo of the payload bay, depending on the location of the equipment in the bay and what connections need to be made.
We created our chases out of 0.020" thick styrene sheet, cut to proper scale width (0.62") and length (7.6"). On top of that strip was cemented a similar length of white styrene C-channel, 0.125" wide by 0.06" high. This creates the primary chase structure, as seen in the payload ops pictures. the "jump-out" location boxes were made from smaller pieces of the C-channel, placed on top of the running C-channel, at the locations near to the payload hardware. wiring will be added using black sewing thread or fishing line to simulate proper gauge.
The payloads are attached to the longerons of the bay by structural fixture plates, attached to the Orbiter and then attaching to the payload carrier trunnion. Again, I was able to lift a picture of a full trunnion plate section, duplicate it for both directions and reproduce it for both sides. These were placed at the points where each module trunnion pin hit the sides of the bay.

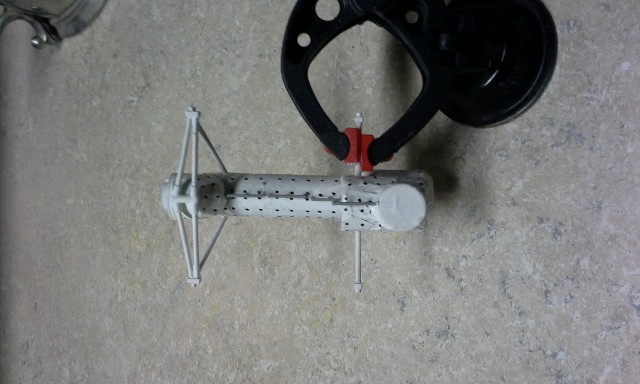
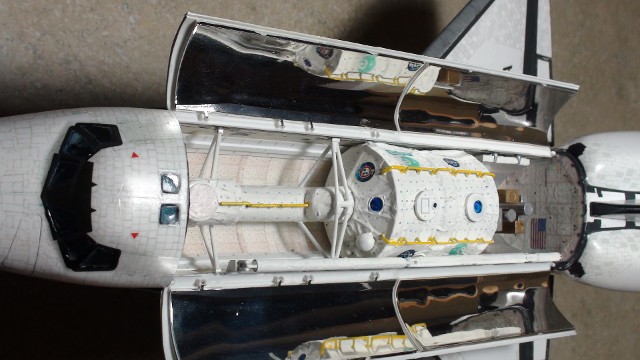
Spacelab Components
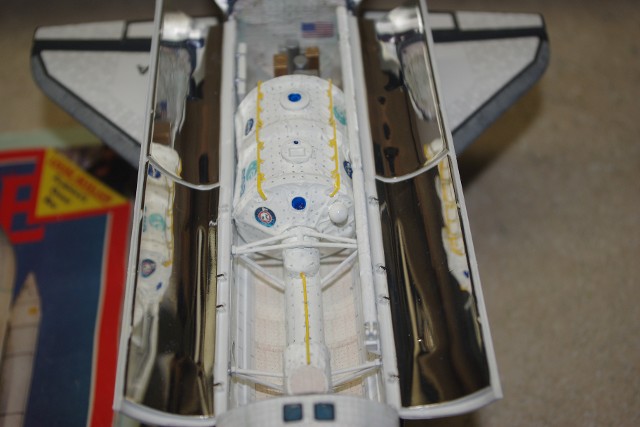
The pressurized Spacelab module, connecting tunnel and equipment pallet were built-up as the instructions specified. The exterior of the lab module was the covered in the aluminum tape we used earlier, wrinkled slightly in the fingertips prior to application, in order to provide a texture similar to that of the thermal blankets covering the actual module. The tunnel assembly was also covered in the same way, as were the external surfaces of the equipment pallet.
The entire exterior of all wrapped assemblies were painted Flat White.
Detailing was first done on the Equipment Pallet. The various experiment canisters were painted in Steel, Gold and Chrome Silver, wile others were left white. The interior surfaces of the pallet were covered with aluminum tape, without any texture, to promote a soft Mirror-like finish.
Both the Spacelab lab module and the connecting tunnel were hand-painted with black "dots" representing the fasteners used to hold the thermal blankets in place on the exterior surfaces of these systems.
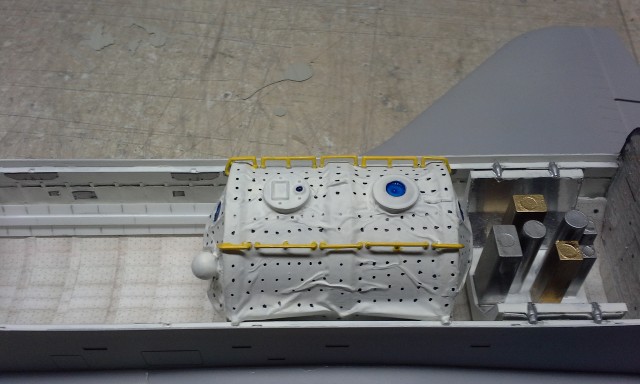
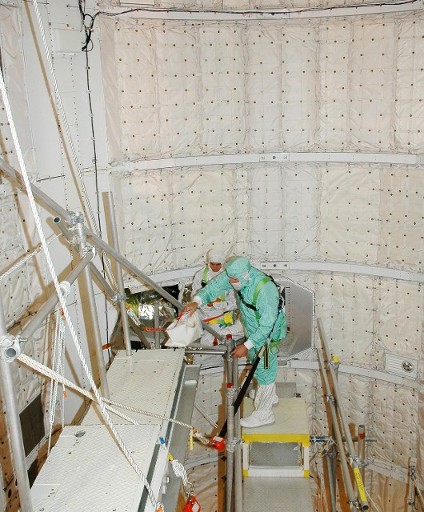
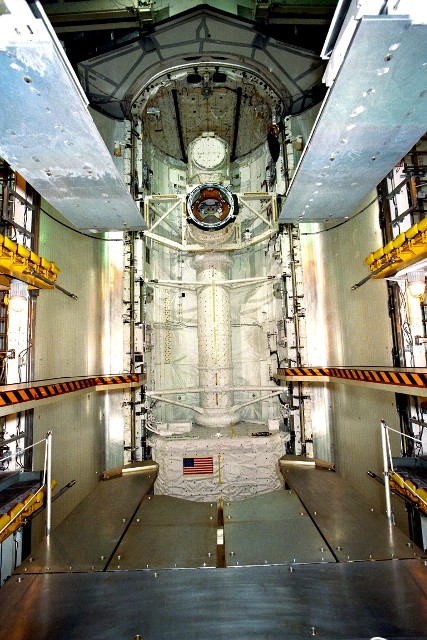
The EVA hand-rails were included with the lab module, but needed to be fabricated for the connecting tunnel. The proper location for the tunnel hand-rails came from another NASA photo of payload operations in the Rotating Service Structure prior to flight.
The outward facing "hatch" of the connecting tunnel will receive a "photo-realistic" application of hatch detail from another NASA photo, yet to be done and applied.
Upon reflection of the results, I decided the "dots" were a little too pronounced, so I used a wash of Flat White, brushed over the dots to subdue them slightly. I think this result is more visually correct, as the fastener dots are visible but not prominent.
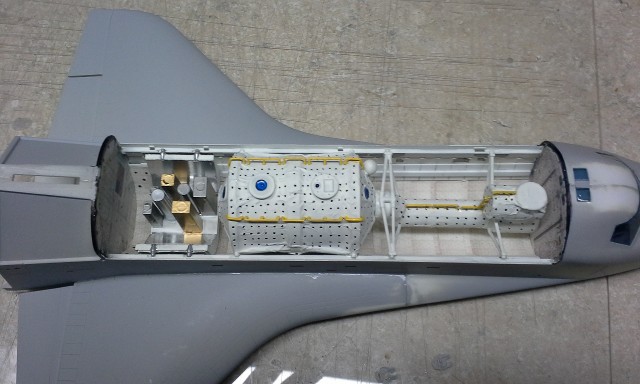
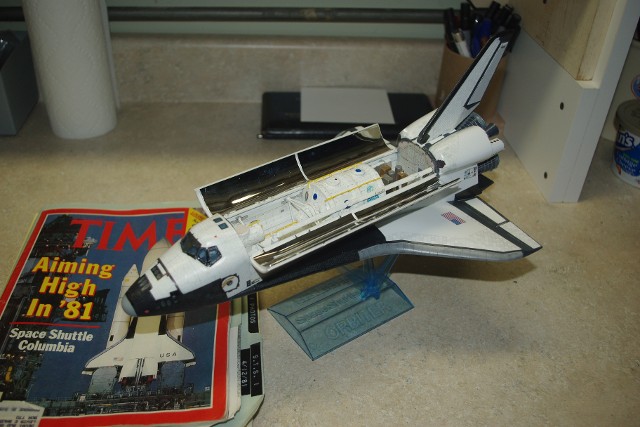
Exterior Work
We've just begun working on the exterior of the Orbiter, except, of course, that you can see that the wings are installed, along with the Flight Deck in place, which allowed close-out of the Forward Bulkhead for the Payload Bay work.
In the meantime, we assembled the Vertical Stabilizer (tail) of the Orbiter. The Tamiya design is ingenious, as it properly replicates the "split rudder" of the Orbiter, which is used as a speed brake during approach and landing.
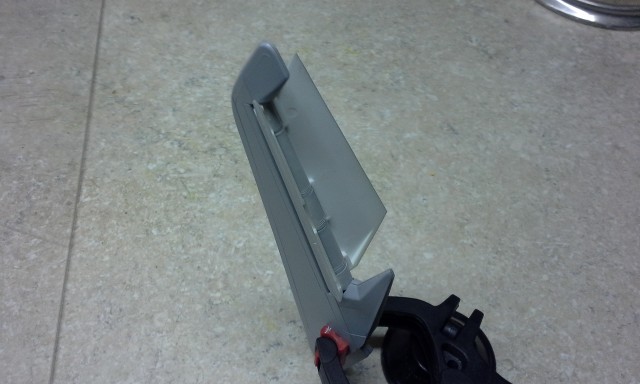
The two haves of the rudder are assembled around a metal axle, which then is captured by the halves of the stabilizer when it is fully assembled. This is the only Orbiter model which properly shows this action of the vehicle.
Once we got to this point in the build, I decided it was a good time to give the model its two primary colors - Gloss White for all of the upper surfaces and German Grey for all of the lower surfaces. It was Tamiya German Gray that Ed Bisconti originally recommended as the base for his Shuttle Tile Decals. This model will likely be covered with a mix of the War Birds 1/100 scale Shuttle Tile Decals and re-scaled versions of Ed's 1/144 scale tile decals, which I purchased, but never used. Now, they will be templates for re-scaled 1/100 and later, 1/72 scale for another Shuttle project.
To do the painting of all of the exterior surfaces, I press-fitted the Vertical Stabilizer into its location, and used masking tape to close off the seams around the sides and top of the Payload Bay Doors.
Once the paint had dried, I removed the Payload Bay Doors and the Vertical Stabilizer from the model and began work on adding the German Grey areas to the Stabilizer.
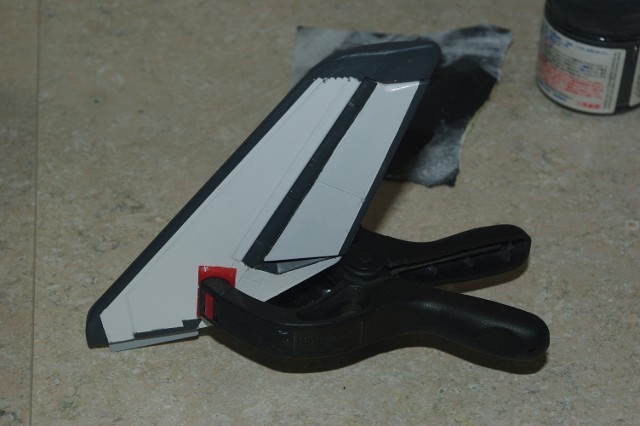
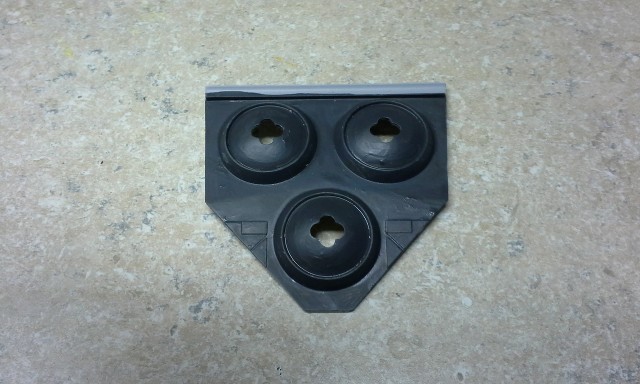
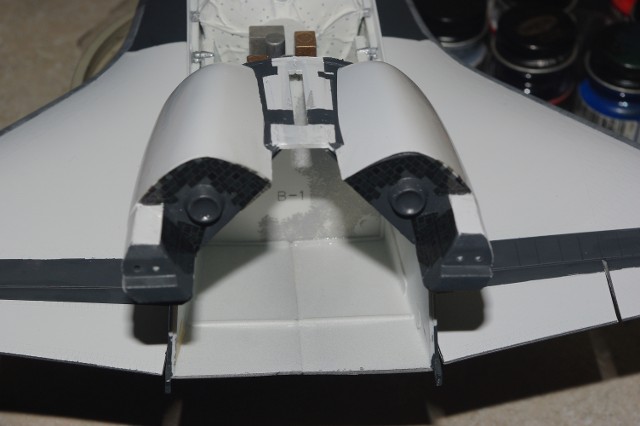
I continued to work on the Aft Bulkhead, where the SSMEs mount. This was the first attempt at using some of the re-scaled Bisconti tile decals, and they worked very well. I also created the white gussets of the engine gimbals by cutting out circles of Avery self-adhesive label stock, with an 13/16 O.D. and a 21/32 I.D. The cut-out rings of label stock were then placed tight against the inner seam of the gimbal surface and pressed flat against it.
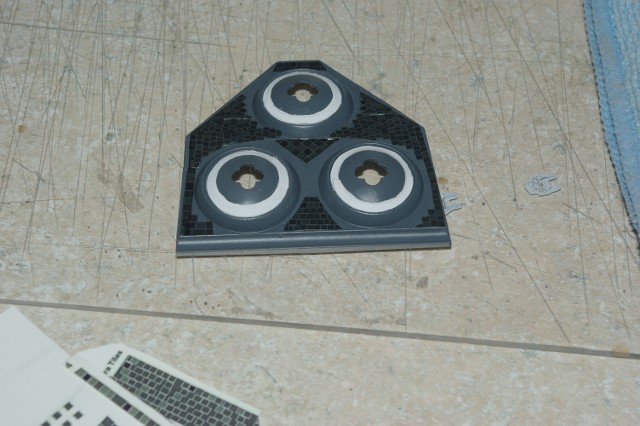
The three finished SSMEs were then positioned onto the bulkhead for a visual fit-check. The results look fine and appear ready for dull-coating.
This also seemed to be an appropriate time to use the OMS Pod rear surface decals from the re-scaled Bisconti decals on the OMS Pods as another fit-check. Once again, the re-scaling appears true.
This was also the point where I decided to start applying the War Birds decal set, in order to see how the decal systems would work together. The War Birds decals for the upper wing surfaces worked fine.
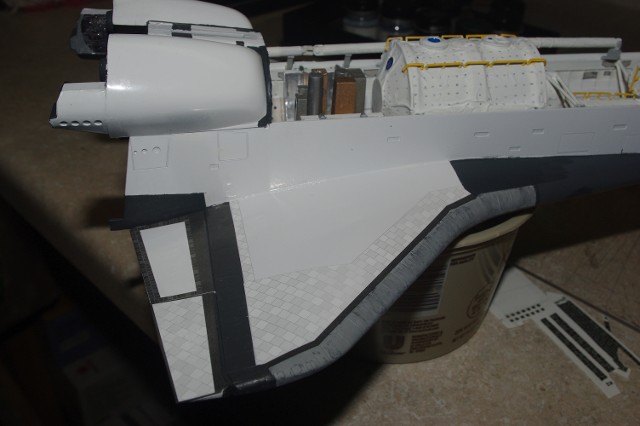
The wing leading edges were previously coated with a base coat of Light Neutral Gray in Model Master enamel, then "streaked" using Gunship Grey acrylic paint, brushed onto the surface and whipped off with a damp paper towel.
We also test fitted the Remote Manipulator Arm onto the right longeron supports. The decals used to create the pattern on the RMS's End Effector were gleaned from a set of stripes from a model car decal, which was cut down to fit the location. All joints and supports will be done in Flat White.
I found that the War Bird black tile decals were not working to my liking on the Orbiter, as the tile size is too coarse. I went back to the set of re-scaled tile decals I made from Ed Bisconti's 1/144 scale sheets and created a full set of black tiles and re-adjusted the color of the white tiles, in order to get a better match the War Bird white tile decals used along the sides of the Payload Bay, below the door seams.
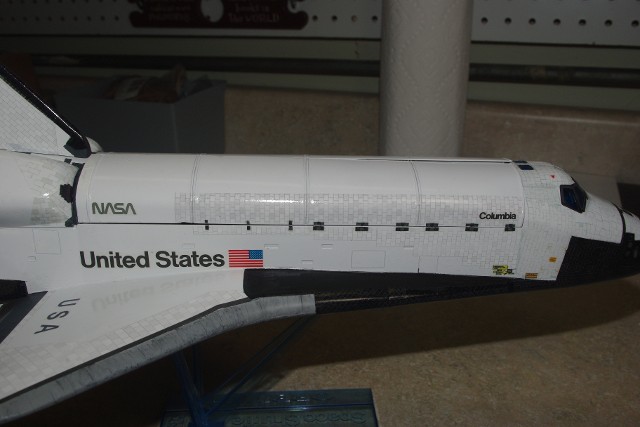
Two steps were made in order to get the white tiles completed. The color-adjusted versions of the re-scaled Bisconti decals were used on the forward fuselage sides, upper nose surfaces and cockpit areas. I also created a "sheet" of War Birds white tiles from a hi-res scan and cut strips of the white tile sheet to finish the tile application onto the Payload Bay doors. The dark tile covers for the door hinges were from the re-scaled Bisconti set, as were the NASA worm and "Columbia" livery, warning markers and rescue markings. The "United States" decal was from the Tamiya set, furnished with the model. I probably should have used the set from the re-scaled Bisconti sheets, as the Tamiya livery is just a bit big.
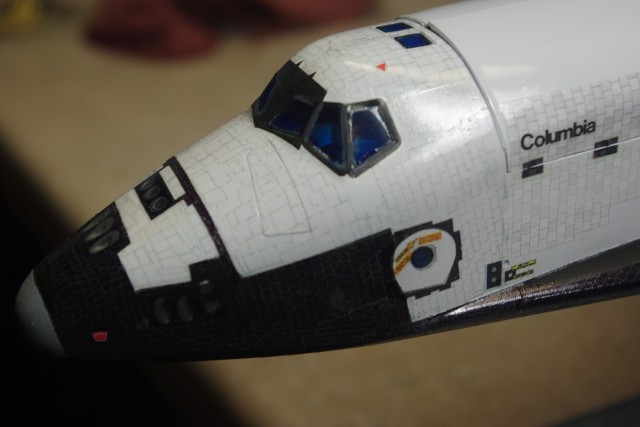
This shows the Bisconti black tile decals on the nose and sides of the nose. The tile pattern simply "agrees" visually with the model better and offers more complete coverage that the War Birds set bid. Again, re-scaled Bisconti decals were used for the top edge of the Forward RCS section, hatch rescue markings and side body vent markings. The window frame decal was from the Tamiya furnished set.

This shows just how well the re-scaled Bisconti black tile sections worked on the model. The elevon sections needed to be re-sized a bit,, as they were sized for the Revell 1/144 scale model, whose elevons must be slightly larger than the Tamiya's are. With a small amount of trimming, things fit just fine.
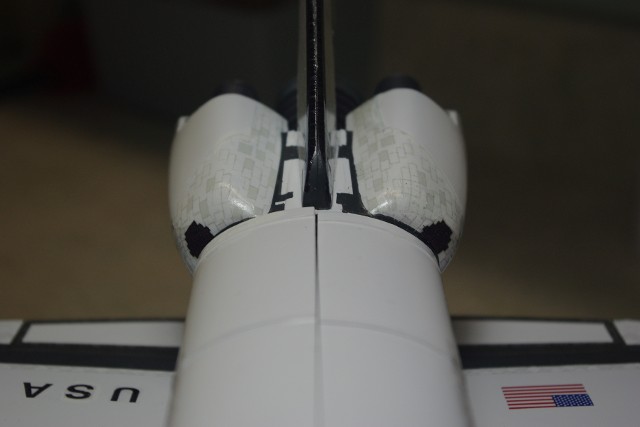
A close-up of the OMS pods shows how I used the left-over upper wing surface decals from the re-scaled Bisconti set to make the covers for the forward surfaces for the pods. Pod seams were a combination of decals and hand painting, and the front-lower black tile sections came from the Bisconti set.

After all of the decals were applied, I used Microscale "Micro Mask" to cover the front windows, overhead windows and hatch window. The model was then set up for matte-finishing.
Final assembly constituted placing the radiators onto the interiors of the payload bay doors. The decals from the re-scaled Bisconti set were used on the Spacelab module and hand-coated with Microscale "Micro Flat" to blend them into the flat white surfaces. About this time, the Micro Mask was removed from the windows, and any frame decal edges caught by the mask were touched up in semi-gloss black.

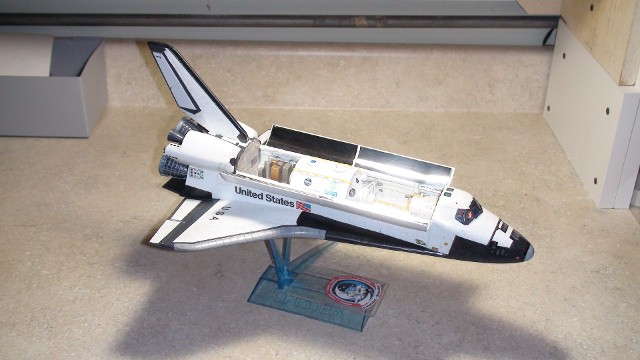
Here's a look at the coated underside of the Orbiter. Ed Bisconti's decals provide a richness of detail I've not seen in any other Shuttle decal set. I wish I had scanned the 1/72 scale set I used on the Monogram "Discovery" model before I used them. I think the detail in "scaling down" would be better preserved than in "scaling up." But, these look great all the same.
The Tamiya 1/100 scale Orbiter model does have better detail than many other Orbiter models, but what it gains in overall detail improvement, it seems to lack in other areas, likely because the moldings were done in the very early history of the Shuttle, prior to STS-1 and any reference material from which a greater sense of what "space-worthy" Orbiters would actually look like.
None the less, I found that with a little ingenuity and some graphics skills, plus some luck in obtaining a 1/100 War Birds Shuttle Tile Decal set (Yes, they were hi-res scanned prior to use) and the successful first attempt at home decal generation (Thank You, Ed!!), this little model of Columbia on her STS-9 - Spacelab 1 mission came out looking very good indeed.
The tile decals seen on the sides of this OV-102 model are readilly available in 1/144 scale and 1/72 scale, and now available for the 1/100 scale Tamiya model on a "made to order" basis, from the Space Modeling Products Page. Click Here to see the listings.
We are now offering many of the other Orbiter decals in the 1/100 scale.
Check the listing in the Web Store, note the 1/100 scale product numbers and use the Contact Us page to order.
They are only made in small quantities so we will verify their availability at the time of your order and ship them to you once completed.